APEX Interactive Grids are a great tool for users to search and manage their data. Because of their extreme adaptability, you can fulfill a wide range of client requests with them. Recently, a client asked to be able to make rows read-only if an admin has validated the data for that row. If so, they would mark the validated column as ‘Yes.’ However, it wasn’t as simple as using Interactive Grid’s ‘Allowed Row Operations Column.’ When this is in place, all columns for that row are disabled; however, in my particular instance, only a small number of specified columns needed to be disabled.
But it’s important to note that this solution isn’t just for when you want to make it read-only based on another value on the grid. It can be applied in a way that will make particular columns read-only regardless of values.
I’ve experienced this problem in the past, but fortunately, Keny Colina, one of Insum’s experts on Interactive Grids, has already found a solution. So, in the end, I made it work for this particular scenario with a few tweaks, and I’ve created a straightforward example for you to follow.
Here’s what we’ll be implementing:

STEP 1 – Set the Interactive Grid’s Attributes
Add your interactive grid with a static ID. In this example I set the static ID to “readonly_emp_ig_id” and set your IG to editable. To do this simply go to ‘Attributes’ on your IG and under Edit, toggle ‘Enabled’ to on.
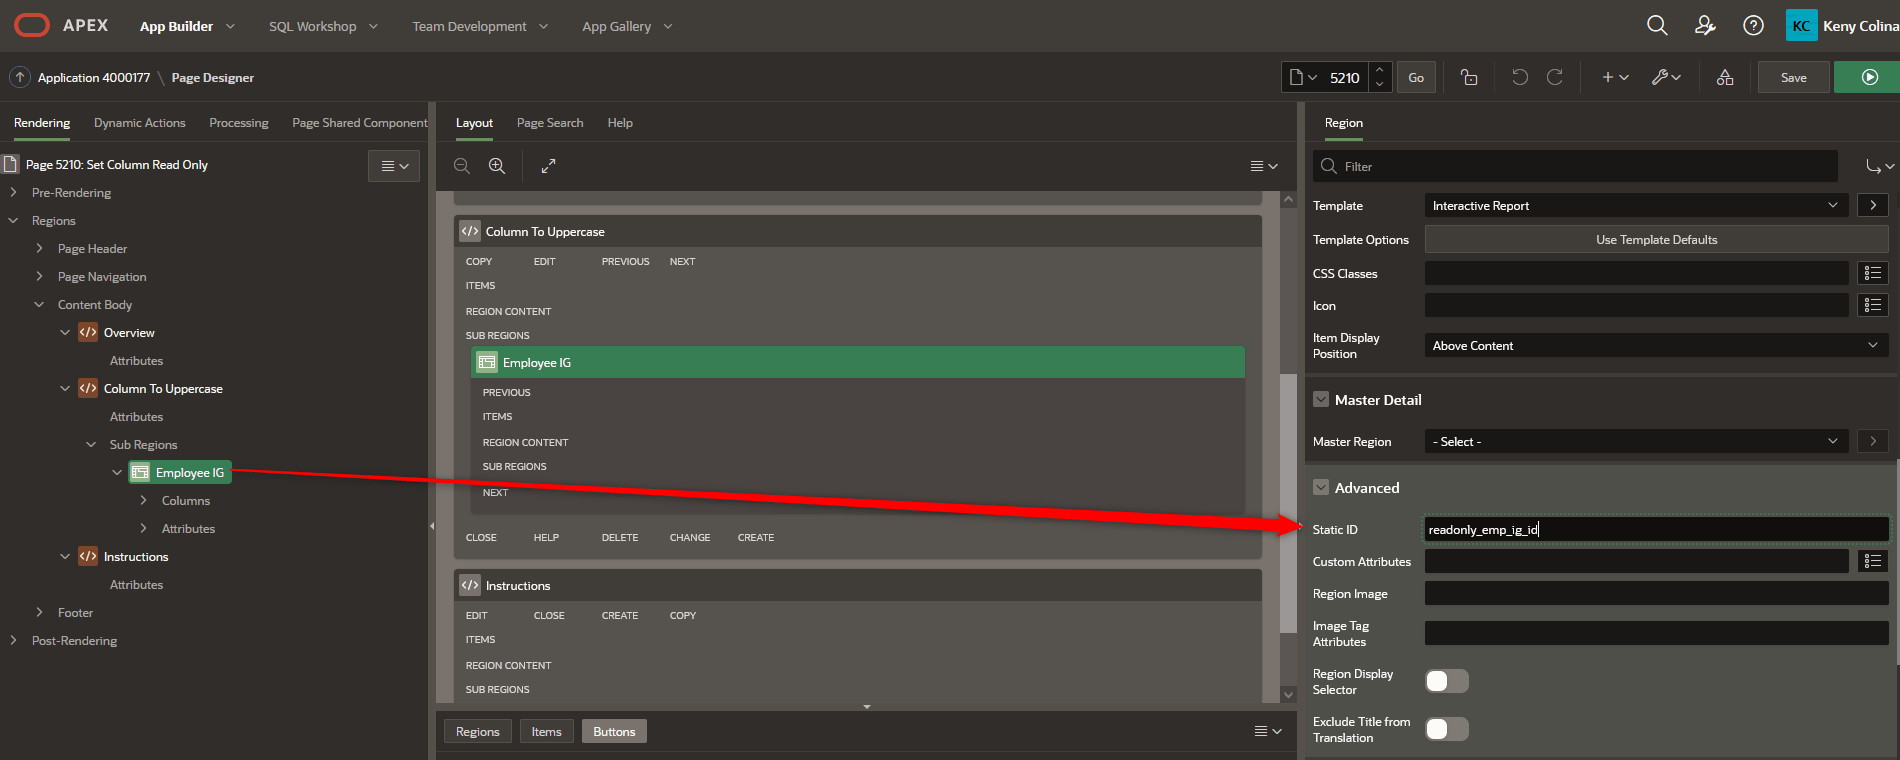
Set the IG’s Static ID
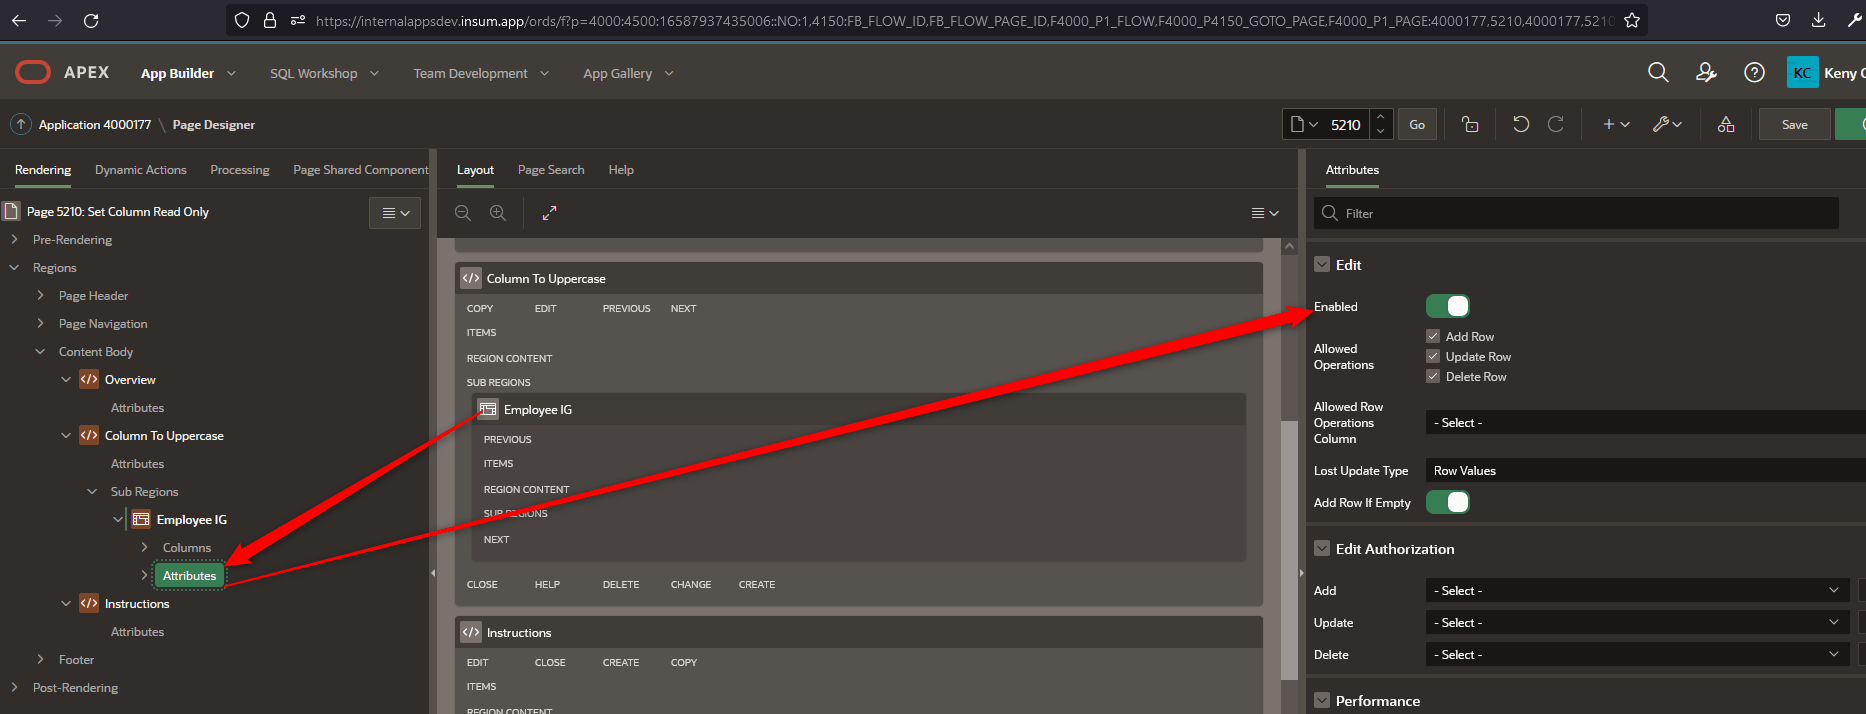
Make the grid Editable
STEP 2 – Function and Global Variable Declaration
Go to Function and Global Variable Declaration and add the following JavaScript code:
function setCellsToReadOnly () {
    var grid   = apex.region("readonly_emp_ig_id").widget().interactiveGrid("getViews","grid");
    var model  = grid.model;
    var recordVal;

    // loop through the records
    model.forEach(function(record, index, id) {

        // getFieldKey returns index used for given field name when accessing that field of a record. Allows you to access a record field.
        recordVal = record[model.getFieldKey("VALIDATED")];
        var meta   = model.getRecordMetadata(id);
        var fields = meta.fields;

        if (!fields) {
            fields = meta.fields = {};
        }

        if (!fields["EMPNO"] || !fields["JOB"] || !fields["MGR"] || !fields["ENAME"] ) {

            fields["EMPNO"] = {};
            fields["JOB"] = {};
            fields["MGR"] = {};
            fields["ENAME"] = {};
        }

        // Validated is a select list (Y/N) therefore it's stored as an object and to retrieve the return value we use Object.keys(recordVal)[0]
        if (recordVal[Object.keys(recordVal)[0]] === 'Y') {
            // set to read only
            fields["EMPNO"].ck = 1;
            fields["JOB"].ck = 1;
            fields["MGR"].ck = 1;
            fields["ENAME"].ck = 1;

            // invoke the change
            model.metadataChanged(id);
        } else  {
            fields["EMPNO"].ck = "";
            fields["JOB"].ck = "";
            fields["MGR"].ck = "";
            fields["ENAME"].ck = "";

            model.metadataChanged(id);
        }
    });
}
Now we’ve got three more simple steps but first, a few things to note about the above code. In this code you can see we are using the model interface. The methods used to maintain client side Application Express data models are found in the apex.model namespace. These models keep information for display via UI elements. In this codes we are using a few of these methods. One example is when we are looping through the records and we use getFieldKey() to access the value for the column ‘VALIDATED’. As we loop through the records we can check whether Validated is Y/N and depending on that value, we’ll apply read only to the columns we specify. Using
var meta = model.getRecordMetadata(id); var fields = meta.fields;we access to the metadata related to a specific record and we can use ‘ck’ to set a record field to read only. Which is what we are doing with
fields["EMPNO"].ck = 1EMPNO is of course the name of our column. I recommend checking out this link to view the other properties you can employ here, in addition to ‘ck’.
This code offers just a glimpse of what you can do with Interactive Grids and a bit of jQuery, and make sure to comment below if you’d like to see future posts on this topic.

In this JavaScript code you will only need to change the static ID that is passed in, as well as the column names. To be clear, these are simply the names of the columns; static IDs are not required for any of the columns.
STEP 3 – Call the JavaScript Function
Under JavaScript –> Execute when Page Loads –> setCellsToReadOnly();
But hang on there’s more. Unfortunately if you only leave it at this when you Save the IG, the columns will not reflect the Y/N until the page is loaded again. So step 4 will show you how to fix this.
STEP 4 – Add a Dynamic Action
Event: Save[Interactive Grid]
Selection Type: Region
Region: [name of your IG region]
Add a True Action
Action: Execute JavaScript Code
Code: setCellsToReadOnly();
STEP 5 – Yay! Final step!
Unfortunately, if you test it right now, when you click ‘GO’ to search, when it reloads, the cells that are suppose to be read only are editable! Initially I tried to fix this with a dynamic action on refresh of interactive grid. But no luck. However I found that adding another Dynamic Action for the Event: Selection Change [Interactive Grid] did the trick!
Add a Dynamic Action.
Event: Selection Change [Interactive Grid]
Selection Type: Region
Region: [name of your IG region]
Add a True Action
Action: Execute JavaScript Code
Code: setCellsToReadOnly();
There you have it, one JavaScript function, one function call when page loads, and two dynamic actions, and that’s all!
Lastly, you can find all the documentation for the jQuery UI widget for interactive grids here. And find more on the model interface and it’s methods here.
More on the topic
APEX Instant Tips episode #71 covered Oracle APEX Interactive Grid’s Allowed Row Operations setting. To learn how to make certain ROWS of your grid editable or read-only, check out the episode!
Oracle Specialists - APEX Experts
Your business is constantly evolving. To ensure your applications don’t fall behind,
enlisting the help of professionals who know the ins and outs of working with Oracle-based products is key.
Learn more about a few of our services:

Thank you very much Elisabeth, I did not know this was possible. If you haven’t tried to rewrite your code to follow John Snyders comment, I did it so let me share.
—-
function(options) {
options.defaultModelOptions = {
check: (result, operation, record, addAction, recordsToAdd) => {
if (!result) {
return result;
}
if (operation !== “canEdit”) {
return result;
}
if (record === undefined || record === null) {
return result;
};
var grid = apex.region(“readonly_emp_ig_id”).widget().interactiveGrid(“getViews”,”grid”);
var model = grid.model;
var id = model.getRecordId(record);
// getFieldKey returns index used for given field name when accessing that field of a record. Allows you to access a record field.
var recordVal = record[model.getFieldKey(“VALIDATED”)];
var meta = model.getRecordMetadata(id);
var fields = meta.fields;
if (!fields) {
fields = meta.fields = {};
}
if (!fields[“EMPNO”] || !fields[“JOB”] || !fields[“MGR”] || !fields[“ENAME”] ) {
fields[“EMPNO”] = {};
fields[“JOB”] = {};
fields[“MGR”] = {};
fields[“ENAME”] = {};
}
// Validated is a select list (Y/N) therefore it’s stored as an object and to retrieve the return value we use Object.keys(recordVal)[0]
if (recordVal[Object.keys(recordVal)[0]] === ‘Y’) {
// set to read only
fields[“EMPNO”].ck = 1;
fields[“JOB”].ck = 1;
fields[“MGR”].ck = 1;
fields[“ENAME”].ck = 1;
} else {
fields[“EMPNO”].ck = “”;
fields[“JOB”].ck = “”;
fields[“MGR”].ck = “”;
fields[“ENAME”].ck = “”;
}
return true;
}
}
return options;
}